
Whether you’re interviewing for an entry-level software engineering position or building enterprise software at scale, data structures are going to be integral to your success. They are a fundamental pillar of programming and can sometimes be a little tricky to navigate. Data structures are like the tools in your toolbox, you need to know how each tool works in order to decide which one is appropriate for your use case.
JavaScript rose to popularity by being the de facto scripting language of web browsers from very early on. As such, JavaScript was not a fully featured programming language but rather created to add a little bit of dynamic interaction to websites. Its popularity then exploded after cross-JavaScript runtime environments like Node.js allowed developers to build native applications outside of the browser. JavaScript evolved as its use cases evolved, so as time went on, JavaScript began expanding its native data structure support.
While it doesn’t have a native implementation of a pure hash table, JavaScript has a Map class that has similar characteristics. However, the hash table is an incredibly important data structure in software engineering, and understanding how it works will help be essential to have a successful career in software development.
Hash Table
A hash table, also known as a hash map, is a data structure that maps keys to values. They use hashing functions to do the mapping, and in some implementations, the keys can be any arbitrary type. Hash tables have many different uses, most often behind the scenes. They are sometimes used in cache implementations and as the underlying logic to build a set data structure.
Moving forward, we’ll examine the basic anatomy of a hash table, its efficiency, and how to implement one in JavaScript.
Hashing Functions
Hash tables are incredible data structures because not only do they have the benefit of efficient property lookup, but on average, they also have efficient insertion. The way this is accomplished is in part by using a hashing function. The hashing function coerces your key to an index in a way that is repeatable and uniformly distributable. It also reduces a key universe of arbitrary size down to an index universe of fixed size, with a negligible time penalty.
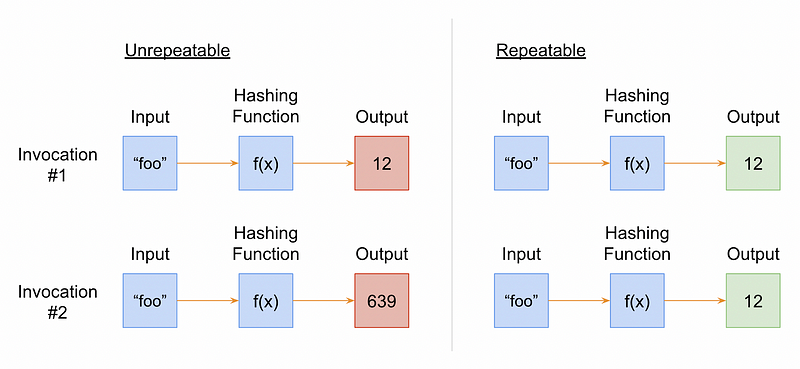
Let’s explain repeatability. A repeatable hashing function is a function that produces the same output every time, given the same input. For example, a function that uses the length of a string input as the output would be considered repeatable. Conversely, a function that adds the length of the string input with the current calendar month number to calculate the output index would not be repeatable. This is because if you invoke the function in January, and then invoke it in February, the indices would be different.
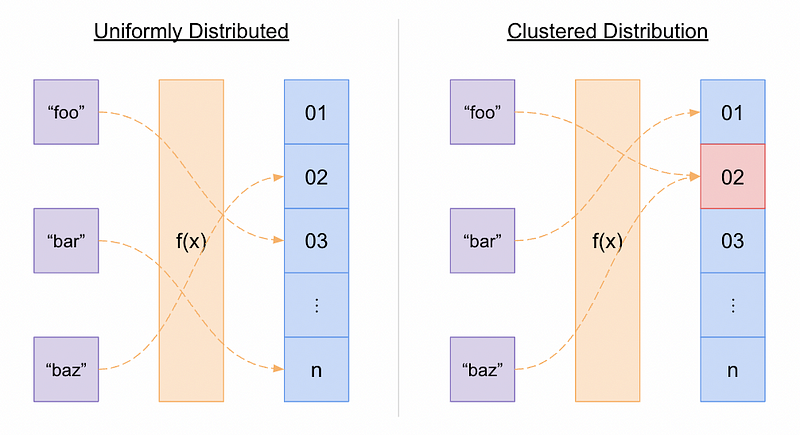
As mentioned above, a hashing function’s ability to uniformly distribute its output indices is another critical role it serves. Uniform index distribution means that the output indices have roughly the same probability of landing within any part of the output range as any other. This is to avoid index collisions as much as possible because collisions are expensive to resolve. Let’s illustrate this point, further.
Collision Resolution
Of course, at a certain point, index collisions are inevitable because you’re reducing a potentially large key universe down to a fixed size. So as your number of properties approaches your total index range, the marginal likelihood of a collision increases. Fortunately, some brilliant people have already thought about this, and there are some techniques to help resolve collisions.
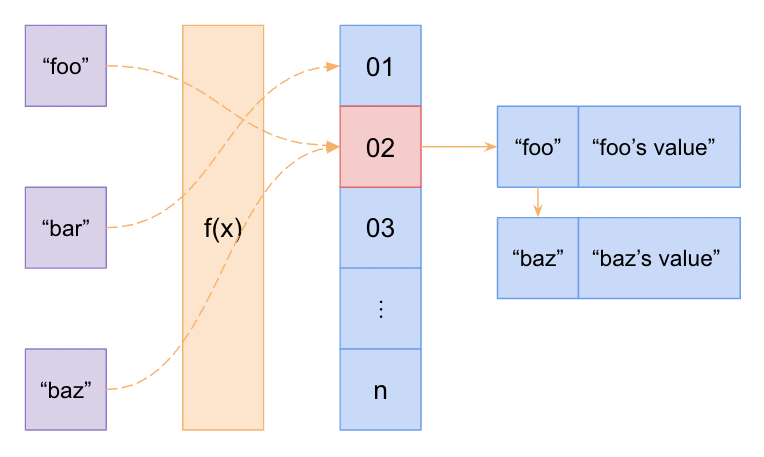
One common method is called “separate chaining”. Instead of inserting a value at the computed index for that key, when there is a collision, those key-value pairs are inserted into a linked list (or another data structure) located at that same index. Then when doing a look-up or insertion at that index, the linked list is linearly traversed until the key is found. If the target key is not found, then the property does not exist in the hash table.
Another popular method for collision resolution in hash tables is called “open addressing”. In this approach, all values are stored in the hash table itself instead of additional linked list data structures. When a collision occurs, an algorithm is used to probe for the next available space to insert the value. Often, this algorithm is just another pass through the hashing function, known as “double hashing,” but there are other algorithms out there as well. Double hashing has the benefit of being fairly optimized against clustering.
Dynamic Resizing
The more index collisions that your hash table needs to resolve, the more costly it becomes to operate your hash table. Thus, it becomes beneficial to resize hash tables when they reach a certain capacity, also known as the “load factor.” While resolving index collisions can be relatively computationally expensive, so is hash table resizing because it involves rehashing all or some of the existing table properties. Additionally, preemptively resizing your hash table to maintain a minimal load factor can unnecessarily consume memory. Thus, dynamic resizing can be required to make the table larger, as well as smaller.
The simplest way to resize a hash table is to completely rehash all existing properties. When the desired load factor is reached, the existing properties are rehashed to a new hash table with the new, appropriate size.
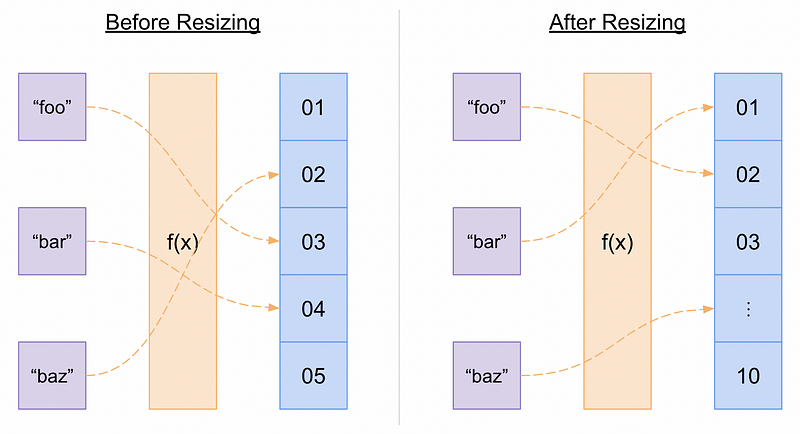
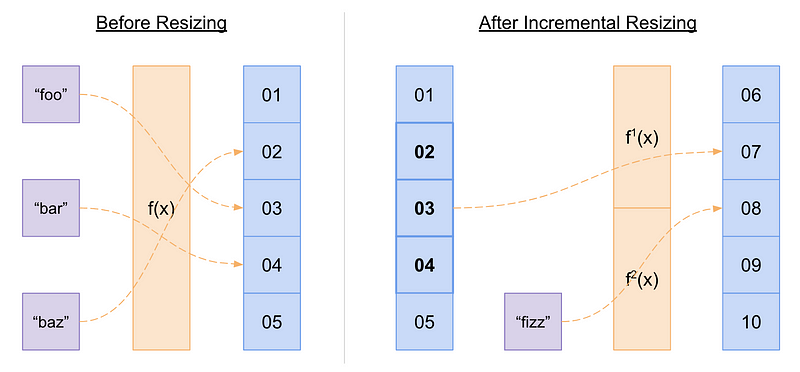
Sometimes it may not be practical to do a complete rehash of all existing properties when dynamically resizing a hash table. In some real-time applications where time is critical and hash table sizes can be enormous, it can be unacceptable to rehash all properties at once. Instead, incremental rehashing can be a more practical solution. This typically involves creating a new hash table alongside the old hash table, inserting incoming properties into the new hash table, and then incrementally moving a small number of old properties to the new table on every operation. This still has the benefit of amortized efficiency, but it means that during the resizing process, each operation (i.e. insert, find, and remove) may potentially require looking up properties in both tables.
Efficiency
When working with any data structure, the primary concern should always be efficiency. There are many different data structures and subsequent variants of those data structures, all of which could potentially be consumed in any given use case, but often times there is a particular data structure that will fit best considering your concerns.
In order to understand how efficient a data structure is, you’ll need to understand the language of efficiency. Big O notation is the standard by which efficiency is determined and it is often used to convey how a data structure will behave in different conditions. When it comes to time complexity, the worst-case and average scenarios are the primary conditions that most engineers will be interested in when deciding which data structure to use for their use case. Space complexity does come into play sometimes, but most data structures have linear space complexity (i.e. O(n)) and memory usage can often easily be scaled, so this is typically overlooked.
In a well-dimensioned hash table, the average time complexity for each lookup, insertion, and deletion is independent of the number of elements stored in the table. In Big O terms, this would be considered O(1), or constant time complexity. This is what makes hash tables so powerful, but the key here is the term “well-dimensioned”. It means that the hash table is sized adequately so that resizing happens rarely. When resizing does occur, it can absorb precious runtime. However, this additional cost can be thought to be amortized across all insertions and deletions and therefore be considered negligible.
Implementation in JavaScript
Hashing Function
First things first, we’ll need a hashing function. As I described earlier, the hashing function is the foundation of this data structure because it coerces your key to an index with effectively no time penalty. We’ll reserve a deep dive into how hashing functions work for another article. For now, take a look at the code below that converts a string to an index in JavaScript.
function getHash(string, maximumInteger) {
  let hash = 0;

  for (let i = 0; i < string.length; i++) {
  	hash = (hash << 5) + hash + string.charCodeAt(i);
    hash = hash & hash;
    hash = Math.abs(hash);
  }

  return hash % maximumInteger;
}
An example of a hashing function to convert a string to an integer, written in JavaScript
It’s not critical to understand how the “left shift” or “bitwise and” operators work and why they’re used here, but it is useful to know what is going on at a high level.
There are two main things that I’d like you to take away from this function. First, you can see on lines 4 and 5 that we’re incorporating every character from the input string into our final hash index. Because every character is used in the calculation of the hash index, the likelihood of hashing collisions is reduced. Second, you’ll notice on line 10 that we’re using the “remainder” operator on the final hash value. This ensures that the resultant hash index is always less than the maximumInteger value provided to the function invocation.
General Structure
We could use a class type here but there is not much to be gained from doing that. Instead, we’ll use a function and add three properties to its this binding. Take a look:
function HashTable() {
  this._limit = 8;
  this._storage = [];
  this._count = 0;
}
The general structure of a function to construct a hash table in JavaScript
We initialize a _storage property as an empty array literal, and that’s where we’ll store our hash table properties. For dynamic resizing purposes, we’ll need to track the total number of properties we currently have and the size limit of our hash table. We’ll track the property count using the _count property and update it each time something is added or removed from the hash table. Similarly, we’ll track the size limit with the _limit property and update it every time we need to expand or reduce the hash table’s capacity.
In case you were wondering, we can’t simply use the length property on the _storage array to gauge our property count because we’ll be inserting items at indices generated by the hashing function. These indices are unlikely to be sequential, and therefore, we’ll have gaps in the array which won’t be reflected in the length property. Try it out in your browser’s console. Assign an empty array to a variable, insert a value at index 5 or any other non-zero index, and then read the length property on the array. You’ll see that the length property is 6, even though we’ve only inserted one item.
Insert Method
Next, we’ll define the insert method and we’ll attach it to the HashTable prototype so we can consume it.
HashTable.prototype.insert = function(key, value) {
    const index = getHash(key, this._limit);
    const storageCopy = this._storage[index];

    if (storageCopy === undefined) {
        this._storage[index] = [[key, value]];
    } else {
        let kMatch = false;
        let matchIndex;

        for (var i = 0; i < storageCopy.length; i++) {
            if (storageCopy[i][0] === key) {
                kMatch = true;
                matchIndex = i;
            }
        }

        if (kMatch) {
            storageCopy[matchIndex][1] = value;
        } else {
            storageCopy.push([key, value]);
        }

      	this._storage[index] = storageCopy;
    }

    this._count++;

    // Double in size when 75% capacity or more is reached
    if (this._count / this._limit >= 0.75) {
        this._count = 0;
        const oldLimit = this._limit;
        this._limit *= 2;
        const tuples = [];

        for (let bucketIndex = 0; bucketIndex < oldLimit; bucketIndex++) {
            const bucket = this._storage[bucketIndex];

            if (bucket) {
                for (let tIndex = 0; tIndex < bucket.length; tIndex++) {
                    tuples.push(this._storage[bucketIndex][tIndex]);
                }
            }
        }

        this._storage = [];
        tuples.forEach((array) => this.insert(array[0], array[1]));
    }
};
A JavaScript implementation of an insert function for a hash table
Let’s analyze the code to better understand what’s going on. The function can be broken down into two main parts: adding the property and conditionally resizing the data structure.
To add the property to our data structure, we first compute the index using our hashing function described earlier. This will provide us a value between 0 and the storage limit we defined earlier, _limit. From there, we check our _storage array to see if something already exists at that index. If nothing exists there, we’ll create a tuple from our key and value pair and place that into an array. Otherwise, if something already exists at that index, we’ll traverse the existing array and compare keys. If that key already exists, update the value associated with that key. If not, we’ll add it to the end of the array. Finally, we’ll update that property on the _storage array and increment our _count value to properly track our current property count.
Now that our _count value is up to date, we need to check if our hash table is properly sized. Deciding when to resize your hash table depends mostly on space versus time considerations, but for the sake of demonstration, we’ve chosen to double in size when the load factor, or the percentage of capacity currently being used, crosses above the 75% threshold. To do this we’ll reset our _storage and _count variables, double our _limit, and most importantly, we’ll rehash our entire inventory of properties. To do the rehashing, we’ll iterate through our nested storage structure, collect all of the pairs into a flat array, and then recursively call our insert method on each pairing.
Retrieve Method
The retrieve method is considerably simpler than our insert method but just as important. To get the value associated with a particular key we need to compute the index using the exact same hashing function (remember, our hashing function is repeatable). We then do a lookup on our _storage array at that index and iterate through the resultant array there to find a matching key. Take a look below to see this implemented in JavaScript.
HashTable.prototype.retrieve = function(key) {
  let result;
  const index = getHash(key, this._limit);
  const storageCopy = this._storage[index] || [];

  for (let i = 0; i < storageCopy.length; i++) {
    if (storageCopy[i][0] === key) {
      result = storageCopy[i][1];
    }
  }

  return result;
};
A JavaScript implementation of a retrieve function for a hash table
Remove Method
The remove method is completely analogous to our insert method described previously. We compute the index, find a matching key if it exists, remove that value from the nested array, and decrement our _count. Then, if the result of a lower property count brings us below our lower bound load factor (in this case 25%), we reduce our storage size in half using a similar recursive algorithm from our insert method. You can see a JavaScript implementation of this below.
HashTable.prototype.remove = function(key) {
  const index = getHash(key, this._limit);
  const storageCopy = this._storage[index];

  for (let i = 0; i < storageCopy.length; i++) {
    if (storageCopy[i][0] === key) {
      storageCopy.splice(i, 1);
      this._count--;
    }
  }

  // Halve in size when less than 25% capacity is reached
  if (this._count / this._limit < 0.25) {
    this._count = 0;
    const oldLimit = this._limit;
    this._limit *= 0.5;
    const tuples = [];

    for (let bucketIndex = 0; bucketIndex < oldLimit; bucketIndex++) {
      let bucket = this._storage[bucketIndex];

      if (bucket) {
        for (let tIndex = 0; tIndex < bucket.length; tIndex++) {
          tuples.push(this._storage[bucketIndex][tIndex]);
        }
      }
    }

    this._storage = [];
    tuples.forEach((array) => this.insert(array[0], array[1]));
  }
};
A JavaScript implementation of a remove function for a hash table
Conclusion
The hash table is one of the most efficient data structures available to us as developers, and it is used as the foundation of a lot of fundamental technology we use today. Understanding how to build one yourself will give you better insight into how and when to use them in your own code.
If you’re curious about how to build other fundamental data structures in JavaScript, check out this article How to Build a Linked List in JavaScript. Or if you’re thinking about joining a coding bootcamp, 10 Things I Learned as a Coding Bootcamp Grad is a great place to learn a little bit more.
Dylan completed his remarkable journey from a restaurant chef with no coding experience to a full-stack software engineer building enterprise-level software in under a year and a half. When he’s not working on software or spending time with this family, he likes to write about testing strategies, software development fundamentals, and his career in general.

One response
[…] If you enjoyed this article, check out How to Build a Hash Table in JavaScript. […]